License Plate Restoration
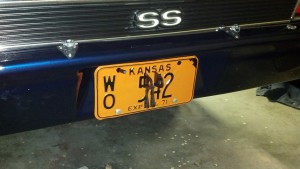
Finished up the license plate project today, this was one of those pain in the ass projects that I’m glad to be done with. It’s not perfect, but good enough. I had the plate sandblasted to get rid of the old paint, which wasn’t a great idea as it did cause some warpage from the heat – or shotpeening affect. Not bad enough to be a big deal, but I would recommend using paint stripper or something should you want to restore your own plate.
We painted the plate with Krylon Semi-Gloss Black with several coats, then a couple coats of Krylon Clear, then Pumpkin Orange – it’s not exactly the original 1971 shade of orange, but close enough. The plan was to sand through the orange exposing the black. 1000 grit sand paper takes a long time to get through a coat of that paint let me tell you! And, I also discovered the letters are far from flat, making it very easy to sand through the black down to bare metal in places. Which, of course require touch up work. Finally, after numerous touch up and resanding attempts we deceided close enough “Tack it!” and put a final coat of clear over it.
The cuts in the middle of the plate are for the parachute and push bar mounts which pass through the plate as well as the Parachute Air Cylinder Tubing and Parachute Cable which go through the two upper bolt holes (drilled out).
I’m pretty happy how it turned out, certainly a lot better than the original plate, but not looking to do another one of these again for a while!!


