Floor Pan Replacement Project
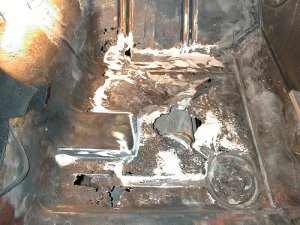 Recently when I pulled the carpet out of the car to start installing the new bucket seats I discovered that the right side floorboard was heavily rusted. The jerk that attempted a previous repair had filled the rust holes with bondo. The picture above (click picture for bigger version) is after I pried most of the loose metal out and wire brushed the majority of the bondo off. Bondo creates a huge cloud of dust when ground with a high speed right angle grinder, I suggest chiseling out as much as possible first if you run into this. After the dust cloud finally cleared I used a putty knife and a screwdriver to dig the seam sealer out of the rocker panel joints and seams.
Next I cut all of the rusted metal out using a air die grinder and a cut off wheel in it. Here’s a picture after the removal of the rusted metal. After cutting the metal out, I used a heavy wire wheel in my grinder to remove all the old paint, old carpet glue, etc. from around the edges so I would have a good surface to weld to. If you’re doing this on your Nova, keep in mind that there is a subframe reinforcement right behind the toe area, so be careful when you’re cutting in that area.
Next I ordered a replacement floor panel from the Paddock, but being a cheapskate I didn’t order the full replacement panel, just the section I thought I needed. Unfortunately, the panel didn’t have the toe board metal, it stops just below it at the firewall seam. Here’s a picture of the replacement panel after it was cut to fit. I kept about a 1″ overlap in the joint area so I would have something to weld to.
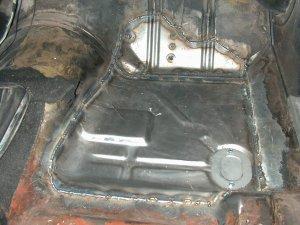 The floorplan replacement took a lot longer than I thought it was going to take, mainly due to having to buy a welder plus getting familiarized with it. I bought a Clark model 180EN, 220 volt MIG which adjusts from 30-180 amps. After figuring out how to run it and doing some practicing I was real pleased with the results. I changed it over from Flux core wire to gas and set it up for .023 wire.
I purchased a new toe board from http://www.carsinc.com which was a lot easier than trying to fabricate one with all those compound bends in it. I would have been smarter to buy the complete right side floorpan upfront, but didn’t realize that the half pans didn’t include the toe part.
I found what works best when putting in the new floorpan was to tack weld it every 6″ or so, then weld beads in increments of about 2″ to 3″ long. My welder runs pretty hot even on the low settings, probably due to the slightly higher voltage in the garage (237 vs 220 which I need to talk to the city about turning down some!). After welding in the floorboard from the top, I deceided to weld the bottom side as well. Welding overhead, under the car is a lot tougher to say the least. I found that it works best if you run as small of bead as you can and just weld short 1″ beads and keeping the gun about a 90 degree angle. Next I’ll get some seam sealer and cover all the joints on the bottom to prevent any moisture from getting in there and trapped in the joints.

